Showing posts sorted by relevance for query Dof. Sort by date Show all posts

Saturday, July 12, 2025

My war on photography influencers


So I asked chatGPT Is #######.###, emails incomplete photography information. For example f/2.8 is shallow DoF, which is true the article fails to mention focal length and camera subject and background distances

Yes, you're absolutely correct. While stating that f/2.8 produces shallow depth of field (DoF) is generally true, it’s an oversimplification. Depth of field is influenced by four factors:

  1. Aperture (f-stop): Wider apertures (e.g., f/2.8) create shallower DoF.
  2. Focal length: Longer focal lengths (e.g., 150mm) compress the scene and reduce DoF.
  3. Distance to subject: Closer subjects result in shallower DoF.
  4. Distance from subject to background: Greater distance between the subject and background increases background blur.

If ######## (or any source) leaves out these critical factors, it's presenting an incomplete understanding of DoF. Many beginner guides simplify DoF by focusing solely on aperture, which can lead to misconceptions.


My photography hangout

 http://bit.ly/46DLwPa


Friday, September 6, 2024

Zone Focus

Many articles discussed sharpness. Yes it's important and many may will disagree with me. 

But do you need to track the eye and spend money to purchase new cameras, "gun site" accessories? IMHO No.

Consider zone focus. 

For me with moving subjects I use Photopills DoF pill to decide will the subject be in focus.

When I'm using my 75-300mm glass wide open at f/6.7 and estimated distance of 100ft my DoF is over than 6 feet. That's enough for me to capture many subjects with acceptable sharpness. At f/8.0 DoF is 8 ft. That works for me. YMMV.

For those not M43 shooters need to consider the sensor size. Using a full frame at 600mm it would cut the DoF about half.

 DoF Simulator

Saturday, May 10, 2025

Why "Use a Wide Aperture for Shallow Depth of Field" Isn’t the Whole Truth

Why "Use a Wide Aperture for Shallow Depth of Field" Isn’t the Whole Truth

Photography instructors often teach that a wide aperture (like f/2.8 or f/1.8) creates shallow depth of field—those dreamy blurred backgrounds. That’s true… but it’s only part of the story. And for many photographers, especially those using Micro Four Thirds or phones, it can lead to confusion.

Let’s break it down.

What Really Controls Depth of Field?

Depth of field (DoF) is influenced by four key factors:

1. Aperture (f-number) – Wider = shallower DoF. Narrower = deeper DoF.


2. Focal Length – Longer lenses isolate subjects more (e.g., 85mm vs. 25mm).


3. Distance to Subject – Closer focus means shallower DoF.


4. Sensor Size – Bigger sensors give shallower DoF at the same framing and aperture.


Why It Matters

If you're using a phone with a fast f/1.5 lens, you might wonder:

> “Why isn’t my background blurry?”


It’s because your phone’s sensor is tiny, and its lens is ultra-wide. Even at f/1.5, almost everything stays in focus due to optical physics.

If you're using a Micro Four Thirds camera, you might notice that f/2.8 doesn’t blur backgrounds as much as a full-frame camera. That’s because your sensor is smaller—so you get more depth of field at a given aperture and framing.

What Instructors Should Say

Instead of just “use a wide aperture,” instructors should teach:

> “To control depth of field, consider aperture, focal length, distance, and sensor size together. A wide aperture helps—but only in context.”


That’s real instruction.

A Practical Example

Phone camera: 4mm f/1.5 lens = almost everything in focus

MFT camera: 25mm f/1.8 lens = some blur, more control

Full-frame: 85mm f/1.8 lens = rich background blur, even at a distance


Same f-number, totally different results.


---

Bottom line: You deserve instructors who explain, not just prescribe. Photography is part science and part art—but learning works best when we teach the science clearly.


Friday, July 7, 2023

It's Not That Simple. There are no absolutes (UP Date)

 I'll use [] to show changes and additions.

Pressing the shutter release is the simple part. Everything takes time, knowledge and experience.

Most everything you read, videos you watch, meetings or workshops you attend suggest "do this .." to become a better photographer. 

But there are no, NO, absolutes only guides.

To improve your photography you need to actually take photos and analyze your results.

I would say the only absolute is composition, focus and as MattK says "The Why ..." Why did you take the photo.

Yes there are "rules" for composition but which for this situation?

Aperture Priority for landscape but ...

 [If there is anything that is moving or may move because of the wind or people you need to consider the shutter speed.  Your camera is will create a "proper" exposure based on your other settings such as White Balance, WB, Metering and Picture Profile like Vivid, Portrait, etc. To accomplish, with a fixed ISO, will adjust the Shutter Speed, SS. to get the "proper" exposure.  The general guideline for proper hand held SS is 1/(focal length) so if your are at 50mm that is 1/50 s.]

Shutter Priority for motion but ...

[Similarly your camera will give you a "proper" exposure.. To do this your camera will adjust the aperture to accomplish it.  However your photo may be soft at the extremes of your scene Consider you are taking a landscape on a windy day and you want the foreground, middle ground and background free of blur. Say your SS is 1/600s  The only thing your camera can adjust is the aperture. Your camera analyzes the scene and  determine the proper Aperture is f/4.0. Is everything acceptably sharp? maybe, maybe not.]

Low ISO for a cleaner photo but ...

[Back in the day, actually not that long ago, many preached "always use ISO 100". Modern camera sensors and software have come a long way. Yes ISO 100 is cleaner, less noise, than 12800 however IMHO get the shot, well exposed, acceptably sharp and focus. Let your camera sensor or/and processing software take care of the noise.]

Never use AUTO but ...

[Consider using AUTO to guide to your settings, when you hand your camera to someone else to take a photo. Frequently the photo is acceptable.]

Use JPEG but ...

[JPEG when you don't do much postprocessing or immediate posting to others. Remember that JPG is like a  wrapped deli ham sandwich.  You can unwrap and add some condiments but it is still a ham sandwich. ]

Use RAW but ...

[On the other had a RAW file might look like a ham sandwich on your cameras LCD. And you can use postprocessing to make is a toasted turkey and ham sandwich. Your choice.]

Fast shutter speed to eliminate or reduce motion blur but ...

[Is that what you want? It is an artistic choice. Do your want to show motion by blur? Do you want to stop an arrow or bird in flight. These are artistic choices.]

Aperture controls DoF but ...

[Yes a large aperture, small f number, yields a shallow DoF. However there are other variables in play. Such as sensor size, distance between camea, subject and background and add focal length. Often those variables are more important than aperture. See dof simulator]

What is DoF?

["is the distance between the nearest and farthest objects in a photo that appear acceptably sharp"]

Use evaluative metering but ...

[All consumer cameras are set to evaluate the light reaching the sensor so  that the brightest and darkest to 18% gray or grey. What is 18%grey? Also remember the other metering modes, center weighted and spot all measure the 18% grey of that area.]  

Use Scene mode but ...

[IMHO use them as a guide. Once you have traveled the photography path I seldom use them. Usually for talking points.]

Full Frame or Crop is best but ...

[Yes Full Frame, FF, has a lot of advantages over than other sensor sizes. When you view an image is it half full or half empty? You need to evaluate your needs and make your own decision.]

Lighting, back, front, side, shadow, harsh, soft, golden, blue, ... hour, ...

[Again you need to learn what they are and when to use them. Sometime you have to deal with the light you have. Basically use you feet and walk around the scene to see what light works best for your photo.]

[A new camera will improve my photography

No it will not! If you take bad photos with your current gear new equipment will still take bad photos. New gear may be easier to use for you, maye assist or improve the Auto focus, and provide other features you desire BUT it will not make bad photos better.  Learn you current camera to the max.]

There is no one thing that makes you a better photographer. It is the combination of all the items above and more that make you a better photographer. But, in my opinion, you need to know your camera. What buttor, what menu item, what ... If you don't know your camera you will be unable to utilize it to your fullest. This applies to the simplest Point and Shoot, Cell Phone camera to the latest wize bang Mirrorless.

Let me paraphrase President Kennedy's quote "We choose to go to the Moon in this decade and do the other things, not because they are easy, but because they are hard."

This way, We choose to become a better photographers not because they are easy, but because they are hard.

[You only get better by taking photos and analyzing your results.]

Saturday, August 19, 2023

DoF, Depth of Field

Previously I wrote on DoF and wanted to follow up. So I asked Bard for help.  

Basically what many don't tell you is that there are 4 major factors that influence DoF. 
  • Aperture
  • Focal Length
  • Distance between camera, subject and background
  • Sensor size
Read the links above for detail and use DoF Simulator setting your camera and lens to get an idea of your DoF


Friday, September 6, 2024

My DoF Rant

I've been somewhat disgusted with the pundents that give simple solutions to complex photography subjects.

For what's it worth. It isn't that simple. Many articles and videos are just click bait. A simple way to improve your photography.

My favorite piss off issue is use a large Aperture to have a small DoF. While not incorrect it doesn't tell the complete story.


In stoppers article dated July 27 2024 it address DoF here.

I've discussed this subject over the years here.

And here https://youtu.be/vaK6bHiD4qU?si=kdco7WJguigFD7Yj

Wednesday, July 12, 2023

DoF, Depth Of Field?

 We have learned that to get a shallow DoF use a large Aperture. So why does your cellphone camera with a large Aperture, say f/1.7, have a wide DoF. Basically why is everything in acceptable focus?


Why?

Use the comment area to post your answer(s)

Sunday, December 1, 2024

Choose Your Aperture

In a recent sippet from The Grid ( about 30inutes in) got me thinking how to choose the Aperture.

Usually I desk check to consider the Aperture I'll use considering my expectation of the scene. I use Photopills app on my phone. You may use this web version. 

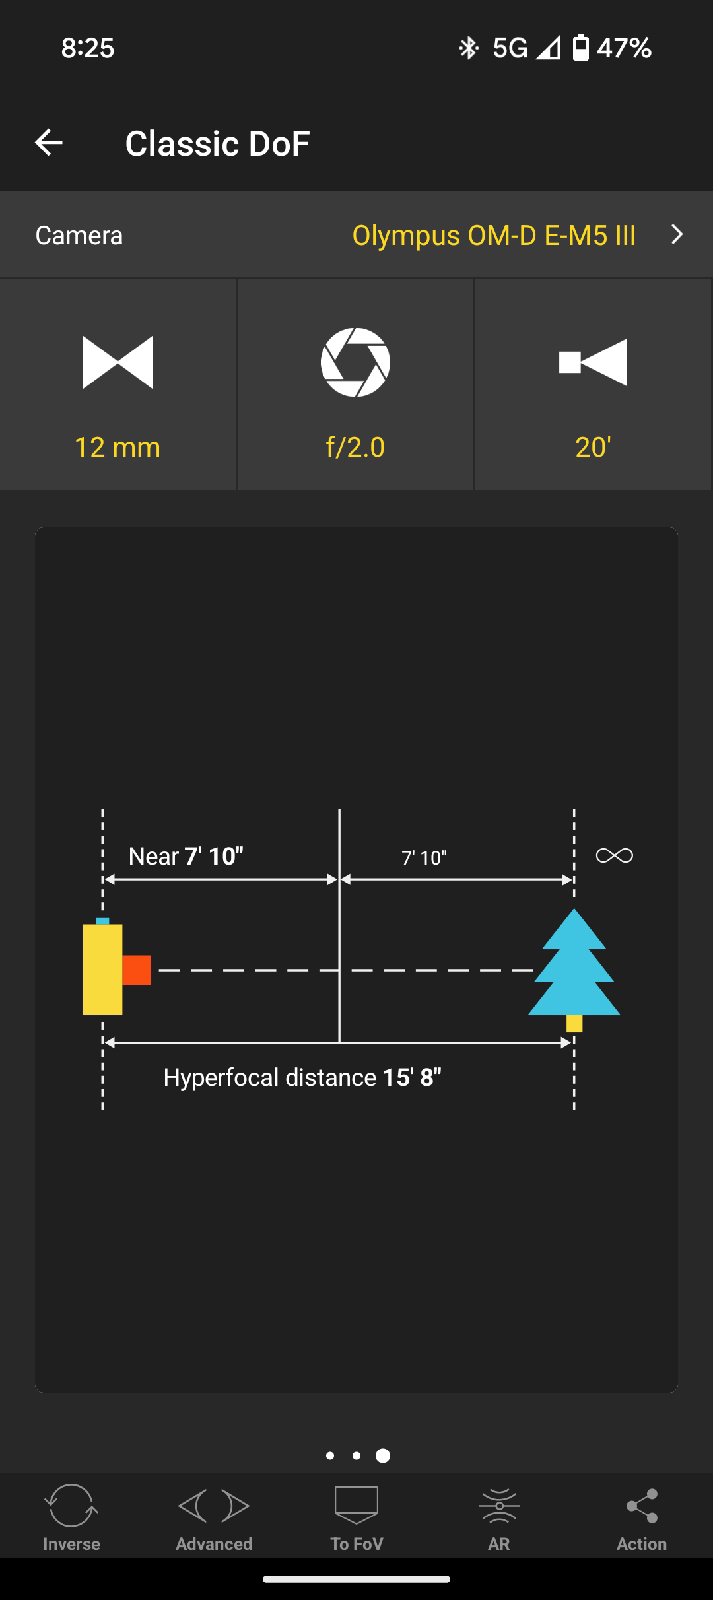
As an example I wanted to that light trails of lighted Disc Golf. I wanted to use my 12mm f/2.0 lens. Since there is no way I could focus on the dark what could I do?

I used Photopills DoF and setup my camera type. f/2.0 then estimated the subject distance to the camera of 50 ft.

That didn't work since the near distance was 49.+ ft. So what if the lighted Disc lands say 10ft from my camera? Using a subject of 20 feet gives me a near Dof  about 9ft and a far of infinity.

The result yes but some of the discs landed out of the Depth of field in front so they are not sharp.

To me it's all about "acceptable" sharpness. 

UPDATE(20241126) - Hyperfocal distance 

Of course YMMV.

Saturday, June 27, 2026

​The Photography Absolutes: Why "Guides" Trump "Rules" Every Time


Pressing the shutter release is the simple part. The rest takes time, knowledge, and experience.
​Most everything you read, the videos you watch, or the workshops you attend suggest doing one specific thing to suddenly become a better photographer. They pitch it like a silver bullet. But let me clear something up right now: there are no absolutes in photography—only guides.
​To actually improve your photography, you need to do two things: take photos, and critically analyze your results.
​If I had to name the only true absolutes, they would be composition, focus, and what instructor Matt Kloskowski calls "The Why." Why did you take the photo in the first place? Everything else is a variable. Yes, there are "rules" for composition, but the real skill is knowing which one applies to your specific situation.
​Let’s look at a few of these so-called photography rules and unpack the "buts" that the pundits always seem to leave out.
​Aperture Priority for landscape, but...
​If there is anything moving in your frame—or if things might move because of the wind or people—you have to consider your shutter speed.
​Assuming a fixed ISO, your camera is going to create a "proper" exposure based on your other settings (like your Metering mode, White Balance, and Picture Profile). To accomplish that exposure, the camera will automatically adjust the Shutter Speed (SS). But remember the general guideline for a sharp, proper handheld shot: 1/\text{focal length}. If you’re shooting at 50mm, you need to be at least at 1/50s. If Aperture Priority lets the shutter drop below that on a windy day, your sharp landscape is gone.
​Shutter Priority for motion, but...
​Similarly, if you lock in your shutter speed, the camera will automatically adjust the aperture to balance the exposure.
​Here's the catch: your photo might end up soft at the extremes of your scene. Imagine you're shooting a landscape on a windy day. You want the foreground, middle ground, and background free of blur, so you dial in 1/600s. Your camera analyzes the scene and determines the proper aperture for that speed is f/4.0. Is everything from front to back acceptably sharp at f/4.0? Maybe, maybe not.
​Low ISO for a cleaner photo, but...
​Back in the day—actually, not even that long ago—many preached that you must "always use ISO 100."
​Modern camera sensors and processing software have come an incredibly long way. Yes, ISO 100 is technically cleaner with less noise than ISO 12800. However, my humble opinion is this: get the shot. Ensure it's well-exposed, focused, and acceptably sharp. Let your camera sensor or your noise-reduction software handle the noise later. A noisy image can be saved; a blurry, missed shot cannot.
​Never use AUTO, but...
​Consider using AUTO as a quick guide to check what settings the camera thinks are appropriate, or when you need to hand your camera to someone else to snap a photo of you. Frequently, the resulting photo is perfectly acceptable. It has its place.
​Use JPEG, but...
​JPEG is fine when you don't plan on doing much post-processing, or if you need to immediately post or share the images with others. Just remember that a JPEG is like a tightly wrapped deli ham sandwich. You can unwrap it and add some condiments, but at the end of the day, it is still a ham sandwich. You can't change its core structure.
​Use RAW, but...
​On the other hand, a RAW file might look like a plain ham sandwich on your camera’s LCD screen. But because it holds all the data, you can use post-processing to turn it into a toasted turkey and ham sandwich with all the fixings. The choice of flexibility is yours.
​Fast shutter speed to eliminate motion blur, but...
​Is that actually what you want? Slowing things down is an artistic choice. Do you want to show the passage of time and motion via creative blur, or do you want to completely freeze an arrow or a bird in flight? Don't let a rule choose your artistic intent for you.
​Aperture controls Depth of Field (DoF), but...
​Yes, a large aperture (a small f-number) yields a shallow DoF. However, there are several other variables in play that dictate what is "acceptably sharp" between the nearest and farthest objects in a photo.
​Your sensor size, the distance between the camera and the subject, the distance from the subject to the background, and your focal length all play massive roles. Often, those variables are far more important than the aperture setting itself. If you want to see the physics of this in action, go spend some time playing with an online DoF simulator.
​Use Evaluative Metering, but...
​All consumer cameras are factory-set to evaluate the light reaching the sensor and average the brightest and darkest areas out to an 18% gray. Remember that the other metering modes—center-weighted and spot—do the exact same thing; they just measure the 18% gray of that specific, localized area. You have to know how the camera is thinking to override it when the scene demands it.
​Use Scene Modes, but...
​Use them as a loose guide when you're starting out. Once you have traveled further down the photography path, you will seldom use them. They ultimately become nothing more than talking points.
​Full Frame or Crop is best, but...
​Yes, Full Frame has clear advantages over smaller sensor sizes in certain conditions. But when you view an image, is the glass half full or half empty? You need to evaluate your unique workflow, lenses, and needs to make your own decision.
​Lighting...
​Back, front, side, shadow, harsh, soft, golden hour, blue hour... You need to learn what these qualities of light are and when to use them. Sometimes, you just have to deal with the exact light you are handed. When that happens, use your feet. Walk around the scene to see what angle of light works best for your photo.
​"A new camera will improve my photography"
​No, it will not. If you take bad photos with your current gear, brand-new equipment will still take bad photos.
​New gear might be physically easier for you to hold, it might assist your eyes with better Auto Focus tracking, and it might provide other features you desire—but it will not magically make a bad composition better. Learn your current camera to the absolute max before you blame the silicon inside it.
​The Takeaway
​There is no single item, setting, or piece of gear that magically makes you a better photographer. It is the combination of all the items above, and more.
​But in my opinion, it all starts with knowing your camera. Which button does what? Which menu item changes that specific behavior? If you don't know your gear inside and out, you will never be able to utilize it to its fullest potential. This applies to the simplest Point and Shoot, a cell phone camera, or the latest whiz-bang mirrorless body.
​To paraphrase President Kennedy's famous quote: We choose to go to the Moon in this decade and do the other things, not because they are easy, but because they are hard.
​Let's look at it this way: We choose to become better photographers not because it is easy, but because it is hard. And you only get better by taking photos and analyzing your results. Now get out there and shoot.

Thursday, June 16, 2022

I don't always us Manual Mode But when I Do

 I don't always us Manual Mode But when I Do I'm usually photographing things with sudden movement potential and I want total control of both the Aperture and Shutter speed.  Also I'm usually using Auto ISO for most of my photography since my camera tops out at 6400 in auto ISO which is the native hi ISO.  I can manually set my ISO as high as 25600.


The Auto ISO settings on my camera have a "Auto" setting for Shutter Speed, S/S, and I have been unable to learn what "Auto" really means.


To day we were at the Kentucky Train Museum in New Haven.  The museum has a nice model train setting and I decided to try a few pictures. I did not bring a flash attachment and my camera does not have a popup flash. So it was native light.


I choose these settings; f/8.0, Aperture Priority and Auto ISO.  The photos of stationary items had ISO of 6400 and S/S as low as 1/4 second. The stabilization did a fantastic job but at below of about 1/20s there is motion blur.


Since there are models running I thought I would try to capture a couple. That meant I needed a faster S/S. ISO to the rescue. I went to the top 25600. But the noise the noise. Yep but deal with it.  I wanted the shot. Get the shot, "Damn the torpedoes, full speed ahead".


After a couple of test shots I set the focal length to 56mm. In Aperture of f/8.0 the shutter speed was 1/60s. Good but not great. I used Lighroom Classic to set the exposure to where I was satisfied. Then in to Topaz to clean up the noise and sharpness. 

f/8.0, 1/60s, ISO 25600, 56mm focal length

Topaz DeNoise AI + Sharpen AI

After review I found that the Aperture of f/8.0 was soft on the top and bottom edges. The focus point was in the middle of the frame. Using PhotoPills DoF pill showed that I estimate the DoF with my lens settings to be 2 feet or less.  If I had used f/16.0 the S/S would have been 1/30s to maintain the same exposure.


Yes it is still noisy and soft but I got the shot.


Tuesday, June 4, 2024

I want to take good pictures

If your goal is to only take good pictures just learn about composition and use the camera you have in your hand. Do you mean a cellphone camera? Yes. Most newer phone cameras do a fantastic job. But I have a top level camera. You will get good pictures in Auto mode. My camera doesn't have a Auto mode. Then you purchased a camera beyond just taking good pictures, it's a pro-rated camera.

What should I do to get pictures that are better than good? Study, it's that simple. Photography is about light. There are 3 adjustments that control light. Two are creative and one a brightness control, like a volume control.
The creative controls are Aperture and Shutter Speed. 

Aperture - the size of the lens opening, f-stop. Aperture controls DoF, Depth of Field. Although distance from camera to subject to background also DoF.

Shutter Speed - controls motion, your motion as well the scenes motion.

Brightness - known as ISO. Higher ISO, like gain or volume, increase noise.

"Choose your Shutter Speed with PURPOSE and your Aperture with FEELING. Then adjust the BRIGHTNESS with ISO." Joe Edelman

There's much more in later posts and in previous posts.

Tuesday, December 3, 2024

Photograph your foot

I initially wrote this in a post to another club. I created the blog post because I met others who hadn't picked up their cameras for a few years.
I believe they can jump start their photography. Even today I take photos of my foot to reinforce my understanding.


Why?

It's handy.

It's about 5' from your camera when sitting in your recliner.

Ok, but why?

It's a learning tool.

When watching TV and the commercials on pickup your camera. Take a photo of your foot. 

Why? It's not about your foot, it's about learning. Your camera, DoF, Focus area, Focal length, manual focus, noise, focus point, Aperture, shutter speed, program, auto, ISO, and more 

Why? It's easy, you don't have to travel. 

Do it with purpose. You could actually learn.

Sunday, September 18, 2022

Aperture Priority Usually Fails for Me

 Aperture Priority is likely the most  popular mode on your camera. But it frequently results in a blurry subject. Oh yes I have image stabilization on my camera. That's not the  problem. The background is fine. Its the subject that is blurred. You guessed it, it's Shutter speed being to low. 

The theory behind of using Aperture Priority is to set the ISO and the Aperture and the camera will choose the shutter speed to result in a proper exposed photo.  There are 2 problems, one is that metering may fool your camera and give an over or under exposed photo. Ok you can use Exposure Compensation to over come that. The is using Auto ISO not setting a minimum ISO to insure a sharp photo. Since I usually shoot with natural light I am subject to changes to light levels.  In your camera Auto ISO setting you could set a minimum shutter speed and your camera would automatically boost the ISO to get a proper exposure. That works but what is the minimum Shutter Speed should you set?  One stop higher than 1/focal length? So on my 14-150mm which on my 2x crop that means 1/300 sec as a minimum. I would set my auto iso minimum shutter speed 1/600 sec. So my camera would 1/500 or 1/640 seconds.


My choice is to set 1/125 sec when  using Aperture Priority. But my real choice is use Manual.


Really it would be a semi-auto setting since I would use Auto ISO. I would choose my Aperture based on DoF and Shutter Speed based on subject. The ISO would float to give you a proper exposure. You can usually set ISO levels. Usually it is best to choose the base ISO for your camera and the upper limit based on your ISO noise tolerance. My OM-D E-M5 iii will not go above ISO 6400 in Auto. I believe this is because OM Solutions/Olympus above 6400 is an extended ISO.


Monday, September 28, 2026

It’s Not That Simple: Why There Are No Absolutes in Photography

Pressing the shutter button is the easy part. Everything else—the knowledge, the timing, the experience—takes effort.

Most of what you read, watch, or hear in workshops suggests a "do this to get better" approach. But in photography, there are no absolutes; there are only guides. To truly improve, you have to get out there, take the shots, and honestly analyze your results.

If I had to name the only "absolutes," they would be composition, focus, and what Matt Kloskowski calls "The Why." Why did you take the photo in the first place? Beyond that, everything is a choice. You might know the "rules" of composition, but which one fits this specific moment?

Here is why every "rule" comes with a "but..."

The Great "Buts" of Photography
"Use Aperture Priority for landscapes..." BUT if anything is moving—the wind in the trees or people walking by—you have to consider shutter speed. If your ISO is fixed, the camera will chase a "proper" exposure by adjusting your shutter speed. If it drops too low, you’ll lose that sharpness. (A good rule of thumb: keep your shutter speed at least 1/focal length for handheld shots).

"Use Shutter Priority for motion..." BUT remember that your camera will adjust the aperture to compensate. If you’re shooting a landscape at 1/600s on a windy day, your camera might open up to f/4.0. Is your background still sharp? Maybe, maybe not.

"Use a low ISO for a clean photo..." BUT don't be afraid of the dark. Modern sensors and AI software handle noise beautifully. I’d rather have a sharp, well-exposed shot with some noise than a "clean" shot that is blurry because the ISO was too low. Get the shot first.

"Never use AUTO..." BUT it’s a great tool to find a baseline or to use when you’re handing your camera to a friend. Often, the result is perfectly acceptable.

"Use JPEG..." BUT remember that a JPEG is like a wrapped deli ham sandwich. You can unwrap it and add some mustard, but it’s always going to be a ham sandwich. It’s fine for immediate posting, but your editing options are limited.

"Use RAW..." BUT know that it might look a bit "flat" on your LCD screen. The magic is in the post-processing—where you can turn that basic ham sandwich into a toasted turkey and ham panini.

"Use a fast shutter speed to stop blur..." BUT is that what you actually want? Photography is an artistic choice. Do you want to freeze a bird in flight, or do you want to show the beautiful motion of the wings through a bit of blur?

"Aperture controls Depth of Field (DoF)..." BUT it isn't the only factor. Your sensor size, your distance from the subject, and your focal length often matter more than your f-stop.

"Use Evaluative Metering..." BUT remember that your camera is just trying to turn everything into 18% gray. Whether you use evaluative, center-weighted, or spot metering, the camera is just doing math to find that middle gray. You have to decide if that's actually the look you want.

"A new camera will improve my photography..." NO, it won't. If you’re taking bad photos now, a more expensive camera will just take high-resolution bad photos. New gear might have better autofocus or cooler menus, but it won’t make you a better artist. Learn your current gear to its absolute limit first.

The Bottom Line
There is no single "secret" to being a better photographer. It’s a combination of all these variables and, most importantly, knowing your tool. Whether you’re using a cell phone or the latest high-end mirrorless, you need to know which button does what without thinking about it. If you don't know your camera, you can't use it to its full potential.

To paraphrase President Kennedy: We choose to become better photographers not because it is easy, but because it is hard.

The only way to get there is to keep shooting and keep analyzing.

Tuesday, December 8, 2020

Why Exposure Compensation in Manual?

For a few months I have been shooting in M, Manual, usually action, birds. I want to control the DOF and freeze motion. Since the light may be changing I use auto ISO.

So I've wondered what's the use of my exposure compensation, (+/- ) button. So i assigned it to do another function.

Wow, a wrong choice. I follow Robin Wong to learn things about my Oly. Spoiler, basically I now use exposure compensation when in manual made with auto ISO. View this video to know why, 

Friday, August 28, 2026

Focus Point

 I had a photo that I thought was good. But on a closes inspection, zoom 100%, the subject was a little soft, maybe more than a little. So since I hadn't cropped the image I decided to use OM Workspace to take a look. Most editing is in Lightroom/Photoshop but OM Workspace has a coupe of features that Adobe doesn't have. One is the focus point.

So where did I focus and what focus mode did I use?

Spot focus mode and something out of the DoF of the subject. This is the screenshot. 


The green dot is the focus point. So next time I give a 9x9 grid on my OM-D E-M5 iii.